momgineer

STEM Sticks for Brain Breaks

Do you have a STEM station, STEM lab, or makerspace in your classroom or homeschool? If you aren't sure how to facilitate STEM / STEAM learning, fear not! It may sound intimidating but it is truly intuitive to kids especially at the primary level where their little minds are bursting with imagination and creativity. By setting up a ready-to-go STEM station, you will be providing an open invitation for STEM exploration.

STEM sticks
What are STEM sticks? Think of Brain Breaks activity sticks but with a STEM spin on them.Though it's best to do STEM challenges in small groups and get everyone involved, these are fun for filling gaps in the day: use as an independent activity your early finishers or at a science station, or as a way to transition back to the classroom after lunch or a field trip.


For the Youngest Students
For your youngest inventors, all you will need is an inventor's box. You could make image-based STEM sticks, but chances are they will just start building at the station. Here are some ideas you can search through for ideas about what to put in yours:

https://www.pinterest.com/search/pins/?q=invention%20box

I change out materials based on what I have. Here is our current STEM station (index cards, string, aluminum foil, craft stick, straws, clothes pins, glue, rubber bands, paper clips, cardboard tubes, pipe cleaners):


Something I also LOVE for a station like this is a cheap dollar store chip and dip tray (coffee filters, pompoms, plastic egg cartons cut into thirds, washers & lollipop sticks, beads, building block components, string, fabric):

If you are doing STEM challenges with your little ones at home or are a Kindergarten teacher, please head over to TpT to download this free recording sheet:
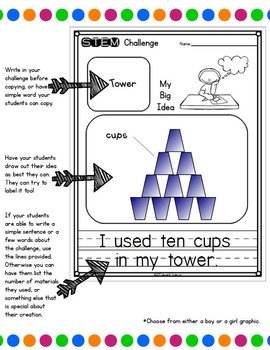
https://www.teacherspayteachers.com/Product/STEM-Challenge-Recording-Sheet-for-Kindergarten-Kids-2000130

For the Classroom
I printed out 5 inch x 1/2" strips with STEM ideas and glued them onto one side of a large craft stick, with a STEM sticks label on the reverse.


At the STEM station, it's a good idea to have STEM journals or lab sheets. To follow the engineering design process, you need to plan before you start to just build! Define the problem, brainstorm ideas, plan it out, build it, and then test it! Have your students record their test results so they can reflect on how well their design worked or if it needs modifications. You can use a simple graphic organizer like the one shown - just download it from the free resource below


I don't have a STEM station!
That's okay! You can also use these as a STEM challenge of the day (or month). Have your students pick three from the jar and let them choose from the three. Send them home with a recording sheet and let them use materials they have at home (this is a good time for them to dig through their recycling bins!).

Are you ready to try STEM sticks or a STEM challenge? Here is a FREE resource so you can try them out with your students.
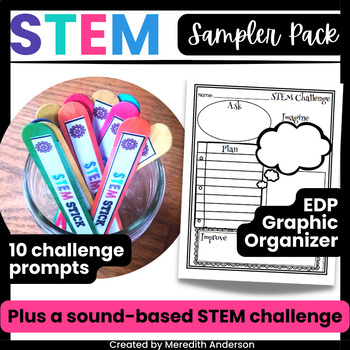
https://www.teacherspayteachers.com/Product/STEM-Sampler-Pack-2220744

If you like the sampler, and want even more STEM sticks and STEM resources for your classroom, please visit:

https://www.teacherspayteachers.com/Product/STEM-Challenges-Classroom-Pack-Includes-STEAM-Primary-Secondary-1851432

The above resource also includes STEM journal options, which can be used full page, printed as a booklet (use Adobe Acrobat Reader), or used in interactive notebooks. Not only does a journal help students work through the engineering design process, it's a great way to document their thought process. It also can serve as a reminder of what worked and didn't work as it might apply to a future problem!


Excuse the hiatus: labral tear

I'm recovering from shoulder surgery. My left shoulder was injured from tennis (I teach a group of homeschoolers the basics) for a year without improvement from rest, ice, and physical therapy. An MRI showed a tear in the labrum, and my surgery was scheduled! I am 3 days post-op now and will be in a sling for 6 weeks, so I'm typing is half as fast as usual. =)


Here is a link to what I had done and here is my shoulder:


I have five small incisions which I'm guessing won't scar. My doctor was able to repair my tear & clean up the swelling in my shoulder. Though there is pain, I'm optimistic I'll be feeling a lot better in no time. I'm very thankful we have an extremely comfortable recliner, since that's where I've been sleeping and will continue to sleep for awhile.

If you are interested in surgical videos, this is the gist of what I had done.


Psst...something exciting is coming!


Several TpT / blogger friends and I have joined up to bring you a week of giveaways and deals! It all starts Monday! You can read details about it here:

Follower Appreciation Week

End of Year Memory Books: POP UP Style!

I have been working on this pop-up book for awhile now and am so excited it's finally finished! Are you looking for something a little different in your end of year memory books this year? How do pop-up memory books sound?

There are base pages (with guides for gluing in the images) as well as the pop up image art. The above pages show the basic book, but I have included several more pages that you can add in based on what you'd like to include.
Fill out the base page and pop up inserts. Color as desired.
Cut out the pop up inserts and fold in half. Fold back the tabs.
Glue in the tabs. Here is the page opened op.
The pop up inserts fold snugly into the book as it closes.
Trim wish washi tape for a fun touch!
This is a fun way to end your year. Pop up books always bring a smile, and the creation of their very own pop up book is a way to instill creative confidence! There is even a page for homeschoolers. I have labeled this activity for grades 2-5, though if you have classroom helpers you could do this with first graders as well. Students in grades 4 and 5 should be able to complete this project independently, while second and third graders might need a little assistance making sure their folds/flaps are creased well and lined up to fold into the book correctly.

You can follow the steps I've shown above to create your own book, or purchase my template by clicking on the image below:

Pop up Memory Book


5 Tips for New Homeschoolers

We are coming to the end of our fourth year of homeschooling, so while we are still learning and finding our groove, there are some tips I'd love to share if you are just starting out. I know this is nothing revolutionary, but I do hope it is reassuring or helpful for those new to homeschooling.
1.  Use your library! If you are just starting out, you might be tempted to purchase tons of boxed curricula. I know I did.What I didn't know is that, especially in the early years, it might just be better to borrow a huge bag of books with every library visit instead of buying tons of curricula that might never get used. Use resources that are available to you for free or almost free before investing money elsewhere. Use interlibrary loan. Use digital library resources. Here in Massachusetts, any resident can get a free e-card for the Boston Public Library and borrow digital books. Their selection is better than our local library consortium's selection, so we have access to thousands more books (all for free). It's great for ebooks and audiobooks. Ask your local librarian what resources are available to you. In our town, we can borrow Kindles from our library, learn a foreign language with Mango, and get passes to local museums.
Low-cost considerations: Speaking of museums, consider a family membership to a local museum. There are also numerous inexpensive websites that I could not come close to listing them all. Before investing in high-priced textbooks or workbooks, take time to explore what is out there for free. Try going to a homeschool fair with gently used resources - you'll be able to peruse them and pay a lot less than new. Here are a few websites to look into:
BrainPOP
Discovery Education
Coursera or edX (free)
Homeschool Buyers Co-op
Khan Academy (free)
Mathletics or IXLTeachers pay Teachers (also follow them on Facebook for some amazing flash freebies)
Teacher Made Freebies (free)
Thinkwell 
Seterra Geography or GeoGuessr (free)

2. Join local homeschooling groups. Try out different activities to find out what works for you and your kids. This might change over time. We belonged to a co-op in the past, but don't participate in one right now. If an activity doesn't exist that you'd like to see, try to set it up yourself. There are often great rates for homeschoolers at museums, zoos, and places like gymnastics and art studios. I set one up at our local Audubon and the kids get three hours of farm school each week. Where should you look to find a homeschool group? Try Yahoo, Facebook, and Google groups. Hopefully you will find some like-minded homeschoolers to share your journey with. You will also find a wealth of knowledge about your state's homeschooling requirements and BTDT advice.
You can set up an informal co-op in your home or connect at a playground with other families. In time, you may wish to do something more formal or join some paid classes as well. You may also be able to trade off teaching subjects with another family. You are not in this alone.

3. Do less. Throw out your ideal vision of homeschooling. However you THINK it will be, it probably won't be that way. For us, we do a minimal amount of traditional school work during the "school year." Why? We are very busy with classes outside the home! Music, foreign language, swimming, farm school, etc. all take a lot of time during the week, and most of the rest of my kids' time is spent playing or reading. So when do we do the fundamentals? Generally we do them on summer mornings. It doesn't take much time, but all of the "extras" are not in session, so it's the perfect time for us to take care of things like math and handwriting. That doesn't mean we do zero math or handwriting during the September - June months, but we definitely don't do it daily. It's what works for us, so we are sticking with it. If it works for your child to spend one month doing only science, and the next month only art, try it out! Immersion works for foreign language, why not other subjects?

Children are curious by nature. Leave them alone with some great learning toys and a stack of library books and see where it takes them.

4. Be flexible. You know if your kid(s) had a good night's sleep, a solid breakfast, and if anything else might be affecting them that day. If something else is going on, like illness or just a THNGVBD (terrible, horrible, no-good, very bad day), give yourself the space to let it go. You don't have to do school every day. The great thing about homeschooling is that because you aren't trying to educate 27 kids, you can do it when the time is right. That means it will take less time. If it's taking all day, try something else. Do you know your child's learning style?
Remember, you can always reevaluate your decision to homeschool. If it isn't working out for some reason, you can always consider sending your child to school. 

5. Make time for YOU. Even if it's 10 minutes of deep breathing, you NEED to take time for yourself. For me, that is a run 4-5 mornings a week. For you, it might mean shutting yourself in your room with your favorite book, or waking early to have some quiet time and tea/coffee before the day begins. Many families have success with quiet time after lunch, where little ones nap and older ones retreat to their rooms to read. Find what works for you. Carve out the time. You are worth it, and it is essential. If the homeschooling parent isn't happy, homeschooling will not be successful. Here are a few more tips on how to take a break when you homeschool.

Do you have a tip that helped you in your first years or homeschooling? I'd love to hear from you in the comments!

Draw and Write Paper: FREEBIE FRIDAY!

Draw and Write Paper


A few years ago I created some simple draw and write paper to use at home with our Draw Write Now books. I decided to update the paper and add several more options! These are available for free download at my Teachers pay Teachers store:

Draw and Write Paper
Create short stories, work on sequencing, instructions, and more, and illustrate them as you write!

http://momgineer.blogspot.com/search/label/download?max-results=12

Wordless Wednesday: Legos (again)


Legos get so much play at our house these days. I love how they incorporated the cannon I made in my engineering shop class back in college.