2011 - momgineer

target practice

My kids are playing this as I type. I was planning on taking them out today but we have had too many 4 and 5 am days recently and I just want to stay home!

What you need:
  • felt
  • velcro strips or stickies
  • lightweight balls
  • tape or marker to mark off a target area
I just stuck the velcro circles (only rough sides with the loops, not the soft ones) to the lightweight balls, made a target on the felt, clipped it onto a hanging blanket with some binder clips, and gave each kid a ball. This is a two-minute setup if you have all the materials! If you have velcro strips you can hot glue them onto the balls instead. I ended up making a few more felt targets after I took the pictures and clipped them all over the blanket, worth different "points" since they love to keep score. I may just have to make an entire carnival of activities for them to do today!

Materials needed.
Balls with the velcro stuck on.
I made the target with painters tape (it was 1" wide, I cut it to 1/2").
A hit! Retrieving the ball.

Easy DIY Wrapping Paper with Homemade Stamps

Easy DIY Wrapping Paper 

Use that packing paper you have lying around from a move or holiday shipments you've received.

What you need:
  • Paper you'd otherwise recycle
  • Something to decorate it with! 
    • stamps are easy - we made our own seasonal ones for winter solstice
    • crayons, paint, pencils, or markers
    • glitter
    • make it 3D by gluing on random objects you don't need
The stamps we used (also used these on our stamped ornaments!)
Stamped paper. Don't worry about it being wrinkled!
Star paper from the back - we used twine to secure the paper.
Use excess paper to write a name tag, hole punch, and string twine through!
Next year at this time I may order extra play silks and we can try out furoshiki, another beautiful way to wrap gifts!

borax crystal ornaments

This is another craft that isn't my own, but I was so thrilled with the results I had to share. My kids were excited to see the end product but the cons are that a) there is a lot of waiting involved, and b) little ones might not be able to achieve the shape they want. The simple snowflakes were manageable for my 5.5 year old, but the more complex shapes were not. It is also worth noting that the size is limited by the size of your jar, so even if your child does manage to bend the pipe cleaners into the perfect shape, it might not fit in the jar!

What you need:
  • wide-mouthed glass jars (I first tried in plastic and the results were poor, though you may have better luck.)
  • chenille stems (aka pipe cleaners)
  • borax
  • wire or ornament hooks
  • boiling hot water
  • skewers or pencils
There are already some great images and instructions here. I used ornament hooks and just laid a skewer across the top of the jar. I think this is a bit easier than using wire and craft sticks. You can use white chenille stems or choose another color. The color will be muted after the crystals grow, though you can try to enhance it with food dye. You can reuse the solution for a new ornament, though I added a little more borax for each new batch. When you are all done making your ornaments, reheat the water to help remove any excess crystals in the jar.

Tip: If you are doing this with kids, do them before bedtime. When they wake up, the ornaments will be ready! 

Here are some suggestions for shapes (stars and hearts would also be nice!):

Snowman.
Snowflake.
An angel a friend of mine made for her daughter. So cute!
Swirl shape.

    salt dough ornaments

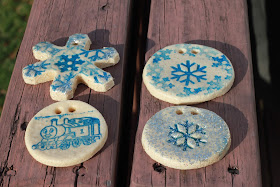
    We have made these for a few years now and they are always a favorite! Check out these gorgeous salt dough ornaments for ideas:

    great detail!!!

    my inspiration for trying out stamps
    (btw, the snowflake stamps I used I made with foam stickers)
    cute as a button!

    Some the kids and I made.
    What you need:
    • Dough (2 parts flour, one part salt, and one part water)
    • Rolling pin
    • Cookie cutters
    • Straw
    • Ribbon or ornament hooks
    • Decorations: paint, glitter, photos, stamps, pen (optional) Note: The pen seems to run on plain salt dough when you spray the gloss, but not if it's used on top of paint.
    • Spray gloss (recommended - I used satin finish)
    Knead, roll to .25 - .5" thick, and cut out with cookie cutters. Make 1 or 2 holes with the straw for your ribbon. Bake at 200°F for 4 or more hours (you might want to flip them half way through). When they are cool, you can decorate them. H&F love to paint them and then shake on glitter (I found red, green, and silver glitter shakers all in a pack at the local dollar store). Let them dry and then spray them to protect them. If you want, you can then add a photo. These were photo ornaments from last year and the kids gave them to their grandparents as gifts:
    I made an indentation for the photos with the back of a measuring cup.
    Baking!
     This photo is after the ornaments were baked - I colored the snowman's hat with a black permanent marker.
    Who wouldn't love a Christmas rhino?
    Some stamped ornaments.
    F's ornaments
    H's ornaments.
    Hanging with ribbon.
    There really are endless possibilities here. You can even attempt three dimensional objects, though I don't think I'm crafty enough for that!


    pipe hype

    What you need:
    • PVC pipe of various length (a pipe cutter helps)
    • connectors (elbows, Ts, etc.)
    • marbles, balls, or cars (depending on the diameter of pipe you have)
    Just let them at it. =) If it is warm out, add water for even more fun!


    Add a box for stability (cut out holes for pipes) and make a marble run!
    Some curvy pipes.
    Giant pipe wooden ball run!

      Exploring Momentum with Marbles and Balls

      Hands-on Force and Motion Exploration 


      This is a fun activity I set up one morning for my kids; it's one that requires little input from you because they will quickly come up with many ways to set it up.


      What you need:
      • marbles or balls
      • scale
      • train tracks, car tracks, etc.
      • tape measure (optional)
      I gathered marbles and small balls and we weighed them on a kitchen scale to see which ones had the greatest and least mass. We then set up two heavy marbles of different mass on the wooden train track (you could use car track, or something like clear tubing, or whatever else you think of!). We put the lighter marbles of the same mass on the incline and let them go and watched what happened when the lighter marbles hit the heavier ones. We then lined up a lot of marbles close together and let a heavy marble go and collide with them. Ask your children what they think will happen. They might be surprised to see the transfer of momentum.

      Weighing the different marbles and balls.
      Setting up the experiment.
      We used a tape measure to see how far the different marbles would go.
      We tried it with lots of marbles!
      You can set it up any way your child wants to try it.
      We even tried with a huge wooden ball.
      This was such a big hit that they asked to do it over and over again!

      ----------------

      This activity was something I did with my children when they were quite young (preschool age), but what a GREAT activity for learning about force and motion in a hands-on way. The physical activity is fun for younger and older kids alike, and you could even ask upper elementary school children to predict how far different marbles will roll based on their mass.

      Nature Activitiy for Kids: Leaf and Bark Rubbing Journal

      Create a Leaf and Bark Journal


      I ordered some blank books in advance of this project, but you could easily do this on paper. Autumn is the perfect time of year to do this in the northeast! We gathered leaves for rubbings from our immediate neighborhood and did bark rubbings while we were out walking around, labeling the bark rubbings if we knew the kind of tree.

      What you need:

      Decorate your Leaf and Bark Journal 

      I found some beautiful leaf stickers on sale at Michaels (don't forget your teacher or homeschooler discount, too!) and had the kids decorate their books:


      We then went outside, finding many of our leaves right in our own yard. We did our bark rubbings, noting the difference between the young and old trees, and we collected our leaves.


      Use a Leaf Chart

      We brought our laminated leaf morphology chart to identify the types of leaves we found:


      When we brought the leaves in we started rubbing and cutting them out to fit in our books, leaf on left, bark on right:

      Another one:

      I really enjoyed this activity and we plan to keep adding to it or start another one when it is full. You could also try pressing the leaves or laminating them to save them.

      Kick this Activity up a Notch 

      If you have older kids, they will still enjoy this activity, but why not take it a step further? Ideas of topics to discuss:
      • Tree life cycle
      • Where do the leaves go after they fall?
      • Why do trees have bark? What is its function?
      • What do leaves do?
      • What do you notice about the types of trees that grow where you live? How are they different from trees that grow in other climates? Why?

      window ghosts

      These were done basically the same way as our Valentine's Day window decorations. The kids really love tearing up tissue paper so I always save as much as I can from gifts or packaging.

      What you need:
      • clear contact paper
      • tissue paper, torn or cut into small pieces
      • stickers or stick on googly eyes, and any other decorations you'd like
      Just cut out some ghost-shaped templates, peel off the backing, stick on your tissue paper, and decorate!
      I cut out some templates of ghosts on the contact paper.

      Making ghosts.
      "Happy ghost"
      "Silly ghost"
      From outside the window.

        sink or float?

        This is a fun experiment to do, because the kids can decide which of their toys/craft supplies they would like to test (as long as they are waterproof). It can be surprising which items will float in water and which items will sink. This is hands-on learning of buoyancy and density!

        Part 1: Random objects
        What you need:
        • large glass/plastic cup or bowl
        • items that will sink or float! (ideas: marbles, paper clips, lemon slice with rind off, legos, lemon slice with rind on, plastic toy animals, craft sticks, sponges, small bowls or cups, a balloon filled with air, a water balloon, a feather, a ball of clay, a boat made of clay, boats made of other items like craft sticks, etc.)
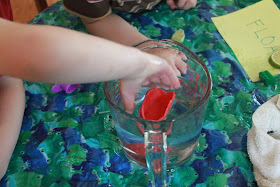
        Have them guess which items might sink or float ahead of time, and see if they're right!  We used part of the Thames and Kosmos Little Labs Boats for this experiment, but it is not necessary to buy the kit to do this experiment.
        Sinking marble.
        Floating clay boat.
        Floating marble in the boat.

        Lego floating.
        You can sort the objects by whether they float or sink.

        Part 2: Eggs
        What you need:
        • 1-3 eggs (one for each glass or just keep reusing the same one)
        • Three glasses, pitchers, or bowls
          • Fill one with regular water
          • Fill one with heavily salted water (stir well)
          • Fill one halfway with salt water, and keep a small pitcher of tap water on hand
        Ask your child what he thinks will happen when he puts the egg in each glass. For the third glass, put the egg in so it will float to the top of the salt water (salt water is more dense than an egg), and then slowly pour the tap water on top. It will keep the egg floating halfway in the glass:

        painting pine cones

        This is a great activity to do outside on a nice autumn day. It is a wonderful fine motor and attention-building activity; painting an entire pine cone takes a lot of focus and time. Collect your pine cones on a nature walk ahead of time if you don't have any nearby.

        I ended up filling another paint cup with glue. Paint the glue on with a paint brush and then sprinkle the glitter on. Glitter in a shaker bottle is handy for this!
        Getting set up.
        What you need:
        • pine cones
        • washable paint
        • paint brushes
        • smocks (it gets messy!)
        • glue and glitter (optional)

        Concentrating.

        It's hard to get in all the nooks and crannies!

        Painting!

        Glittery.
        Letting them dry.
        Pin this idea for later:

        Painting pine cones is a fun nature art activity for little ones! Find and collect pinecones on a nature walk and then paint and decorate them. | Meredith Anderson - MomgineerPainting pine cones is a fun nature art activity for little ones! Find and collect pinecones on a nature walk and then paint and decorate them. | Meredith Anderson - Momgineer