February 2011 - momgineer

craft stick match up

I saw a game like this posted somewhere else (I can't recall where, but if you have seen it please let me know so I can link it!). This would also be fun with large craft sticks and letters, numbers, or rhyming words.

What you need:
  • an even number of craft sticks
  • markers
1. Gather your materials.

2. Draw on some shapes, half of a shape on each stick.
3. Put all of the sticks face down and play!

napkin rolling and folding

Napkin folding and rolling are practical life activities that can become part of your child's a daily meal routine. You don't need fancy napkins or napkin rings. You can make your own napkin rings by cutting toilet paper or paper towel tubes and decorating them with ribbon or fabric. If you use paper napkins, you can still roll them, but you can pick up cloth napkins fairly inexpensively and wash them along with your laundry. It is nice to have larger diameter rings for younger children, like the red ones below:


It doesn't have to be perfect!
This is a holiday set. No, I don't iron my cloth napkins. =)
rocking the Pfaltzgraff
If you don't want to roll, or don't have rings, the folding task is also useful to learn. H generally folds all of our washcloths and small towels now when I'm doing laundry, which is helpful for me and fun for him.  Traditional Montessori folding is shown here and described in impressive detail here. Folding in quarters works for us, so that is what we do! You can try experimenting with fancy napkin folding, too!

Wagon Wheel Pasta Gear Train

Exploring Gears with PASTA!


I dyed some pasta one night to use for some crafts. One of the kinds I had was mini wagon wheels, and when I brought them inside from drying in the garage overnight, my brain was chanting "gears!" so I grabbed some toothpicks and cardboard boxes and made a wagon wheel gear train. I had to share it with the kids (and you too)!

Materials needed for gear pasta:
  • wagon wheel pasta (dye if desired)
  • toothpicks
  • cardboard box

Get started on this gear STEM activity


Pick out the most circular ones to make this easier. All you have to do is put a wagon wheel on the cardboard box and impale the cardboard right through the center hole. Put another wheel next to it and poke your next toothpick through.


Try this with a mix of mini and large wagon wheel pasta as well to make this even more fun! Here's a short video of the pasta gears in action:


Engage your students by going in depth with more STEM challenges

This activity was so beneficial for hands-on learning that I developed it into a STEM challenge lesson for upper elementary students. It can be found as one of the challenges in this STEM challenges resource:
https://www.teacherspayteachers.com/Product/STEM-Activities-10-STEM-Challenges-1560993?utm_source=Momgineer%20Blog&utm_campaign=Wagon%20Wheel%20Gear%20Train%20Post

Pin these ideas for later:

easy puzzle

This is an easy activity that can be done with plain paper, cardboard, etc. Cut as few or as many pieces as you want. I cut jigsaw-style pieces this time but have done plain straight or curved pieces in the past, in a simple woodboard style for infants and toddlers. A colorful shirt box makes for a fun puzzle, but you can also color your own design first to make it even more special. I used scissors to cut the pattern but if you used a pen knife (x-acto) you could do smaller and cleaner cuts.

finished puzzle
1. Find a colorful shirt box.

2. Trim off the sides.
3. Start cutting pieces.

4. All cut! Try to put it back together.

Laminate the sheet ahead of time if you'd like to make it more robust. Let the pieces rest under a few heavy books to help flatten them out. Store in a zippered bag so you don't lose the pieces.

children's garden

It doesn't take much to start a garden, and you can do something as small as an indoor herb garden in a single pot, or an extensive vegetable garden outside. My kids love to expand seedling pellets, and since they are a  busy activity, I have used them the past couple of years to start seeds indoors. We started seeds last week and will continue to grow more until they can be transplanted this spring.
stack of biodegradable pellets
All you have to do is add warm water and a seed or two, keep them watered, and preferably by a south facing window (if you're in the northern hemisphere).
tomato seedlings
It is my goal this year to can even more tomatoes than last year so I'm starting early. If you don't want to grow anything long term, you can sprout some beans without any pellets or soil. Wrap some dried beans in a wet towel or paper towel and check them daily to see if they've sprouted. This is a great way to show your child how a seed starts to grow, because a bean is one of the largest seeds you can use.
bean sprouts
It is very useful to have two little gardeners who can help water, weed, and harvest our fruits and vegetables, and it is a wonderful teaching tool as well. Most kids don't mind getting dirty digging, and the only issue I've had was with an overenthusiastic toddler harvesting unripe veggies. =) We also compost, so they are able to see the cycle go full circle. If you are new to gardening or don't have outdoor space, you could look at doing a kit like this or making your own. I know it's not for everyone, but nothing tastes quite as good as freshly harvested fruits and vegetables! =)

Fun if you are doing a children's garden:
  • sunflowers - fast growing and cheery!
  • cherry tomatoes (can be grown in a pot)
  • marigolds
  • snow peas (also can be grown in a pot)
  • giant (or regular) pumpkins
  • carrots or parsnips - great fun to dig up in the fall!
  • start a praying mantis pagoda and release them into the garden
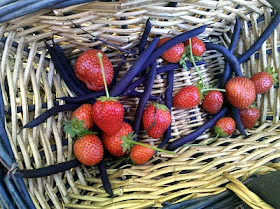
strawberries and purple beans from last summer's garden, mmm!
Do you have a special area of the garden dedicated to your child(ren)? I'd love to hear about it!

DIY Foam Sticker Stamps

Create your own homemade stamps with stickers

Make your own stamps!This is an easy and fun project. This post shows how to make them with wood blocks (they have a nice weight, and will last a long time), but you can use other materials as well. As always, use what you have.


Materials Needed to Create DIY Sticker Stamps

  • scrap wood (or use bottle caps, old wooden blocks, or recyclable containers)
  • sandpaper
  • foam stickers or foam paper cut into shapes
  • washable ink pad (you can also use washable paints on a scrap sponge)
  • paper
1. Cut some blocks from scrap wood (you could also use cardboard for this though they probably won't last as long - glue a few pieces together to make them thicker). These are roughly 2.5" x 1.5" x 1":
    2. Sand the blocks.

    3. Choose stickers that you would like to make into stamps. You could also cut your own shapes from foam paper, or use thick rubber bands and cut and glue them on. Pro tip - to make the stamps easier to use for your little ones, place two identical stickers on top of each other (it makes the stamp part thicker and less likely to get any of the wood block on the print).

    4. Stick them on to one side of the wood block, remembering that the stamp will be the mirror image of the sticker.


    5. Start stamping!


    You can also use plain shapes and then draw in faces, details, etc.What I love about this project is the fact that I know if the foam shape starts to wear out, it can easily be replaced/updated. Other ideas - create a set of letter and number stamps, or make your own holiday wrapping paper - click the image to read the post:

    http://momgineer.blogspot.com/2011/12/homemade-wrapping-paper.html

    mystery bag game

    This is a great activity to help your child learn about adjectives, and one found in Montessori learning, though typically with two sets of geometric solids. You can describe what you are looking for with words such as smooth, bumpy, round, rough, soft, heavy, light, small, large, squishy, and so on.

    1. Find 2 each of geometric shapes, miniature animals, pompoms, straws, etc.
    Why yes, those are homemade tree blocks on the left! Future post, I promise!
    2. Put one of each in an opaque bag (you may want one with a drawstring if you a peeker).

    3. Describe one of the animals outside the bag. Ask your child to find it. Then ask your child to find it in the bag, without looking.

    A few variations on this game:
    • Put *all* the items in the bag. Pull out one first, then try to find its mate. 
    • For younger children, you might want to just use similar (and fewer) items; for example: two balls, two animals, two blocks, two beanbags.
    • If you have more than one child, have them sit back to back. Have one child pull out an item and describe it, pass the bag to the next child and have them try to figure out what it is and find the match.
    This could make a good car/travel game as well if you include a bag for matches as well.

    tangrams

    We love playing with tangrams! The Magnetic Travel Tangoes - Animalsset we have is great, but I thought it would be fun to have a larger set to play with as well so we made some!

    What you need:
    • large piece of cardboard (shirt/cereal box)
    • ruler
    • pencil
    • scissors
    Optional items:
    • printer 
    • clear contact paper
    • foam paper/felt
    • hole punch 
    • sting/yarn
    The instructions for making your own set can be found here. I doubled the scale on my set, and used an old shirt box.

    1. Break open the shirt box and trim the edges off.

    2. Start drawing your grid.

    3. Complete the grid to make it 4x4, trim off the excess, and follow the pattern from the link above or copy mine below. Each of my squares are 2" x 2", for reference.


    4. Before you cut, if you'd like the pieces to be a little more robust, put contact paper on the side you didn't draw on, and trim off the excess.

    5. Cut your shapes! You'll want to either draw your cutting lines darker than mine or pay close attention to the cuts.

    6. The rhombus is the only asymmetric piece so I cut a matching piece out to glue onto the back, since you need to flip it over for certain puzzles.

    You can play with your tangram pieces now! Beyond this point is optional!
    7. I suggest sticking with either your own creations or solutions to the puzzles at first. Tangrams can be very challenging so if you print out silhouettes, try them first just to see how difficult they can be! Here are a few (found by Google image searching "tangram solutions"):
    Animals
    Birds
    Boats
    Buildings
    Fish
    People

    Silhouettes like this are also available.

    I printed out several:

    8. I then popped them into a book with foam paper (felt or cardboard work as well) by cutting two pieces of foam slightly larger than the solutions...

    9....and used my favorite hole puncher and string to finish it off:

    10. Now you can make fun things like a rabbit (this is actually a different one than the one above):

    11. Or you can have a mismatched pajama party and make a house:

    To take this a step even further, add magnets on the back of the shape pieces and it's a fun refrigerator game. You can also add a pocket to the inside of your book and you have a set of travel tangrams for your next long trip (though you might want to make a smaller set for that!).

    homemade board games

    The games we make ourselves always get far more play than ones that were purchased. The best example I have is The Rainbow Game. After what felt like 2000 games of Chutes and Ladders, I decided we needed a game that would move faster. Much, much faster. I grabbed some foam paper and stickers, a hole punch, and string, and The Rainbow Game was born!

    Basically, I strung together several sheets of foam paper and then had the kids pick out foam stickers to make a path from start to finish, and added in "special" stickers that carried meaning. If you land on a dinosaur spot, you get to move ahead 10 spaces. Wow! If you land on a red circle, you lose a turn (I know it isn't promoting the faster aspect, but at least you aren't sliding down a big slide from 87 to 24). If you land on a heart, you get to go again. Want the game to go really fast? Let them play with as many dice as they'd like. H likes to play with anywhere from 2 to 7 dice; adding up all the numbers is part of the fun for him. The playing pieces are anything small enough to fit on the "board" but we are everything from farm animals to dinosaurs to hex nuts to wooden cubes. =)

    If you don't have foam paper and stickers, a piece of cardboard and glued-on shapes you've cut out will work as well. You can even make your own die/dice!


    On the purple rectangle you can choose your own path to try to either land on the dinosaur or hearts. This encourages thinking ahead/planning:

    Feel free to get creative or turn it into a more collaborative (or at least less competitive) game by saying you all advance to the last rectangle but wait until everyone gets there before proceeding to the end, and then you all move together. We *love* the Richard Scarry Busy Town game and that is how the game ends - with everyone winning, or losing, together.

    you've got mail!

    I cannot understand how this wins out over other games and toys consistently, but it is one of the top three things we do with a box when we get one from our overworked UPS guy. If you activate your imagination mode, it is basically this but cheaper and more fun because you make it yourself! You can make a new one each month, when your next Amazon subscription of something kid/baby-related comes.

    It can be summed up in a few simple steps:
    1. Cut a slot (or two) in a box.
    2. Put your mail in that box.
    3. Make them open the box...and that's the way you do it!

    Take everything out and repeat. Vary the sizes of the mail so they have to sort it and figure out where it goes. I sometimes give them real mail that is unimportant, or stickers to decorate the cardboard "postcards." For older kids who are reading or learning to read, you can label them with "Kitchen," "Living Room," etc. or other rooms and have them deliver the mail.  If you have two kids, you can have one deliver and one collect and they will madly run around your home like they are trapped in some M.C. Escher drawing.

    See, it is basically the same thing!